COMMON HAND TOOL TYPES
1. SCREWDRIVERS:
Screwdrivers are designed for loosening or tightening screws.
Driving a screw seems to be a very easy operation to perform. However, without the right screwdriver, good technique or safety rules, it can sometimes become tricky or even dangerous.
This simple family of tools forms the basis for nearly every maintenance, repair and building project.
Professional screwdrivers are manufactured to meet all national and international standards. The range of use is versatile and includes all areas of maintenance and industry.
1.1. Conventional screwdrivers:
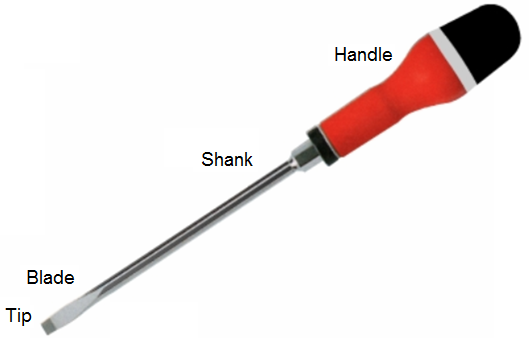
Although some screwdrivers may have a specific design, the basic screwdriver is composed of four parts: The handle, shank, blade and tip (see next figure).
If screwdrivers with wood handles are available, those with plastic handles are preferred because of their greater strength and lower cost. Standard screwdrivers are designed to drive slotted screws.
Today's screwdrivers offer high torque performance without neglecting touch or sensitivity.
Usually, the handle is ergonomic in order to improve comfort and grip. Its swollen tang upgrades ergonomics. The handle material is very resistant to hydrocarbons and oils. Its texture finish ensures firm grip even when greasy.
Shock-proof, the handle is commonly moulded onto a flanged blade, so as to prevent the blade from twisting or being pulled out of the handle. It is also sometimes designed with ribbed sleeves to prevent rolling on flat surfaces.
The shank is often made up of chrome plated with vanadium steel. It undergoes a heat treatment which gives optimum hardness without making it brittle.
Finally, the screwdriver tip is generally in a metal alloy which is very resistant to torsion stresses.
1.2. Specific screwdrivers:
Some screwdrivers have a specific design which differs a little bit from that of basic screwdrivers. We are now going to address the most common types of screwdrivers.
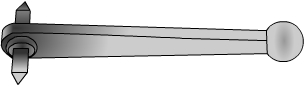
This is the case, for example, of the “Hex. bolster screwdriver”, which is provided with a hexagon bolster to enable a wrench to be used when extra torque is required (see next figure).
See below: Hex. bolster screwdriver.
Note:
When extra torque is required, a classical square-shank driver may also be used with a wrench to gain added leverage.
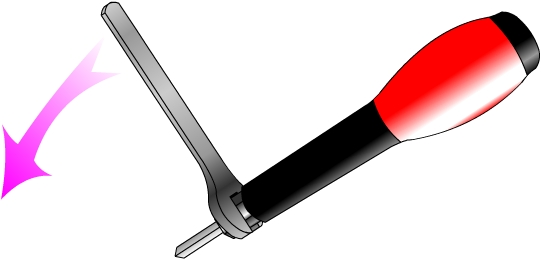
Some screwdrivers have a specific design because they are meant for driving inaccessible screws or working in tight or confined spaces. Let us mention the “offset screwdriver” which is a steel rod bent at 90° at each end.
See below: Offset screwdrivers.
Offset screwdrivers generally feature a different tip at each end.
“Ratchet” screwdrivers (see below) have also a specific design: They are equipped with a head which maintains the screw in position.
This type of screwdriver is particularly handy, as the screwdriver tip does not have to be remove to drive the screw.
Screw-holding drivers are equipped with clips at the end of their tip which hold screws at starting. They are indispensable when the screw hole is inaccessible. This driver has a gripping device at the tip so that the screw can be positioned and driven with only one hand.
Some screwdrivers have very small tips. These screwdrivers are called “micro-torque screwdrivers”. They are usually equipped with externally adjustable torque and are designed to eliminate the possibility of overtorqued fasteners. The bi-directional cam ``slips-free" once the set torque has been reached making over tightening impossible. These screwdrivers, intended for precise works, are often driven electrically.
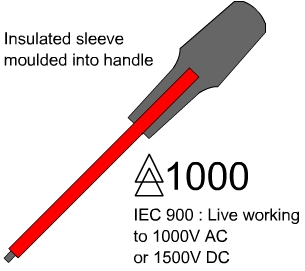
Some screwdrivers are also different from basic screwdrivers, for they are insulated with a sleeve moulded into handle. They are used by qualified electrician personnel for live working up to 1000V. These screwdrivers are conforming to IEC 900.
The standard deals with live working to 1000V AC (alternating current) and 1500V DC (direct current).
See below: Insulated screwdriver.
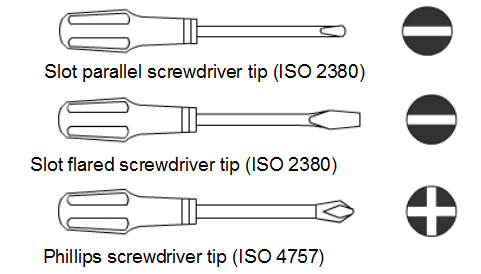
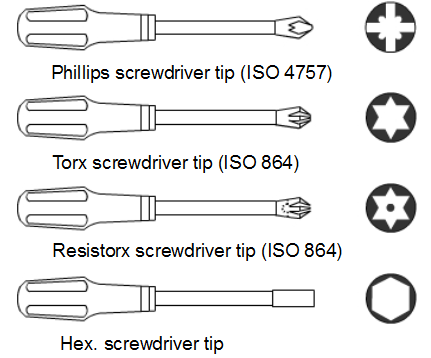
1.3. Screwdriver tips:
Screwdrivers come in a number of sizes and tips that correspond to screw designs. Screw and screwdrivers are classified thanks to ISO standards.
There are several varieties of screw-heads. To a given screw-head design corresponds one type of screwdriver tip which will perfectly fit in.
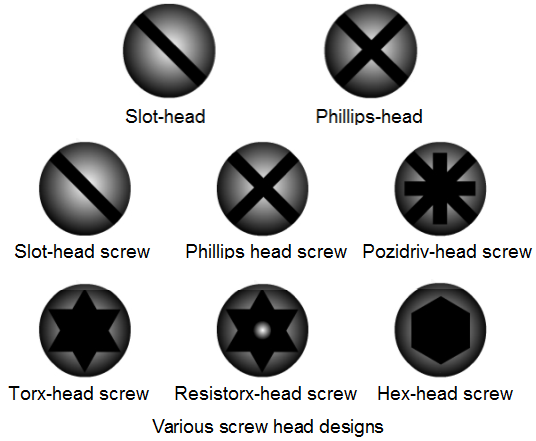
The majority of screws which are encountered are either cross-slot Pillips-head or traditional slot-head.
In addition to the classical slot-head and Phillips-head screws, other kinds of more sophisticated designs may also be encountered including the Pozidriv-head screw, the star-shaped Torx pattern, the resistorx-head screw, and the hexagonal hex-head screw.
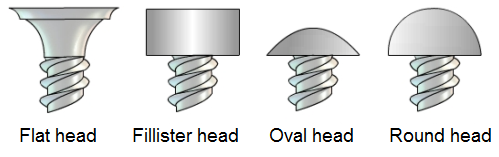
There are also various kinds of screw-head shapes. The most common are the flat head, the Fillister (or cylindrical) head, the oval head and the round head.
The next figure shows various types of tips. Each screwdriver tip corresponds to a specific screw design. ISO (International Standards Organization) standards relates to the screw standards (head, shape).
Note:
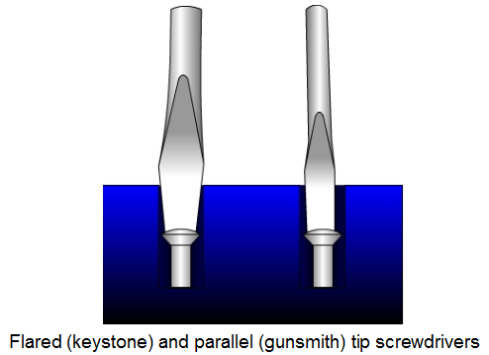
A standard screwdriver may have either a flared tip (also called flared slot-head or keystone) for extra strength or a parallel-tip (also called cabinet tip) which is useful to recess screws in long cramped holes, although it does not offer the same leverage as flared tip screwdrivers.
The cabinet blade (also known as the "gunsmith's" blade) does not fan out; its tip is no wider than its shank.
1.4. Correct use / Safety:
Screw driving requires first of all choosing the right screwdriver corresponding to the screw to be driven. It is essential that the screwdriver might match the size of the slot or recess of the screw. For instance, using a Phillips-head screwdriver to drive a Pozidriv-head screw may damage or even destroy the screw-head or the screwdriver tip, as a Phillips-head screwdriver does not suit a Pozidriv-head screw.
The screwdriver must be twisted into its pilot hole. Then, the handle must be gripped firmly with the palm of the hand.
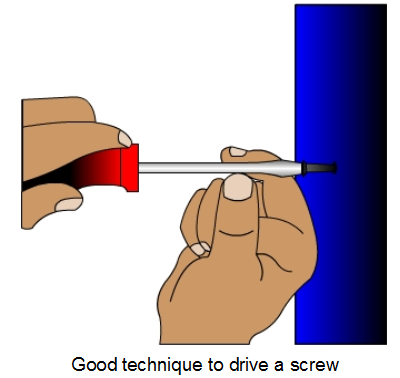
The thumb and forefinger of the hand must grasp the shank above the blade to direct the tip into the screw slot so as to hold tip in place and to keep it from slipping out. The screw and driver must remain in line with the screw-hole. The handle is to be imparted an intermittent rotation while repositioning the hand on the grip. Gradually the torque must be increased as the screw begins being driving in.
When driving countersunk flat head screws, a tip that is wider than the head of the screw may mar the material around the head.
On the other hand, a tip that is too small cannot provide optimal driving force and is prone to slipping out and damaging the slot. A tip that is rounded or misshapen will also slip and damage the screw-head. Once the screw-head is damaged, it may be impossible to remove the screw or drive it further.
The screwdriver is a very safe tool; it presents a hazard only when misused or when the user lacks the knowledge or skill to use it. Keep the following safety tips in mind:
The shanks should never be modified or overheated, for that could damage its metal structure. For the same reasons, a screwdriver must be protected from extreme cold.
A screwdriver with a worn or broken handle should always be discarded.
Plastic shanks are not insulating. Always use a screwdriver conform to IEC 900 when working live.
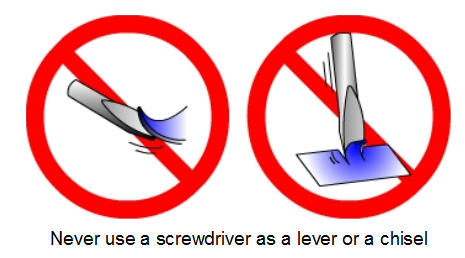
The screwdriver should never be used as a lever or a chisel, or for prying, punching, scoring or scraping.
Never try to turn a screwdriver with a pair of pliers.
Never use a screwdriver on a work-piece held in hand. A slip could cause serious injury. Hold the work in a vise, with a clamp, or on a solid surface. If that is impossible, you will always be safe if you follow this rule: Never get any part of your body in front of the screwdriver blade tip. This is a good safety rule for any sharp or pointed tool.
Always wear gloves and safety glasses when working with screwdrivers.
2. SPANNERS (WRENCHES):
Screwdrivers are used to perform precise works. They drive small fasteners (the screws) which cannot undergo excessive torques. Spanners (also called wrenches) can deliver higher torques to their fasteners (the bolts and nuts). Bolt heads are always hexagonal.
Bolts and nuts are intended for fastening large pieces and for withstanding high loads.
2.1. Design / Ergonomics:
A spanner must basically meet three main criteria: Its head (or end) must correspond to the bolt to be driven, its design must permit to reach the bolt, even in the most inaccessible area, and its handle must resist to the required torque. Spanners are classified according to ISO standards which relate to spanner heads, design and technical specifications.
Although the variety of types of spanners manufactured is practically infinite, two rather broad categories can be established: fixed-end (or conventional) spanners and adjustable spanners.
Other types of wrenches that cannot be included into those categories, such as socket spanners for instance will also be discussed.
2.2. Conventional spanners:
Conventional wrenches are composed of a handle at both ends of which they feature generally two different heads (or ends).
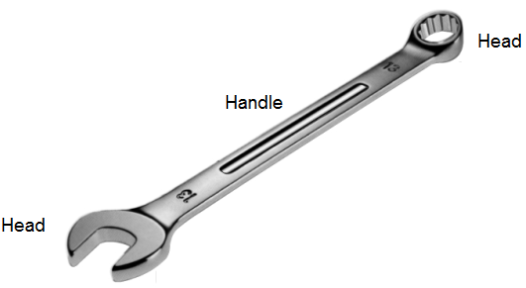
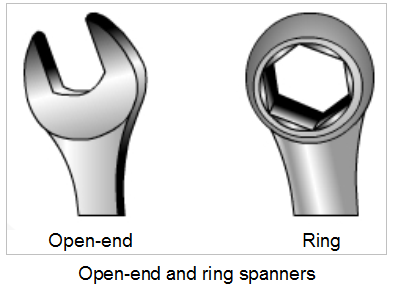
Classical spanners may have two different kinds of head (open-end or ring).
The sizes of wrenches used on bolt heads or nuts are given by the size of the opening between the jaws of the spanner. Common sizes for spanners are 1/4", 3/8", 7/16", 1/2", 9/16"', 5/8", 3/4", 7/8", and 1". Larger sizes are often used in industrial applications.
Conventional spanners are therefore either open-end spanners, or ring spanners (or both as shown in figure). In this case, people speak of combination spanners). The combination spanner has one open end and one ring end. Usually both ends have the same size to allow use in a variety of locations.
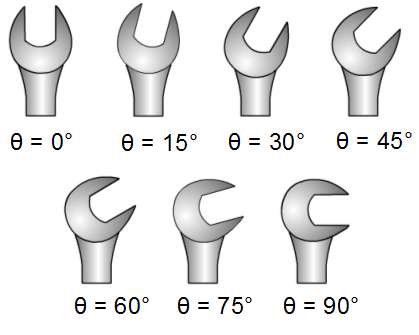
Conventional open-end spanners may be encountered with heads tilted at given angles. This design permits to drive most bolts with comfort
Nowadays, most ring spanners have OGV profile.
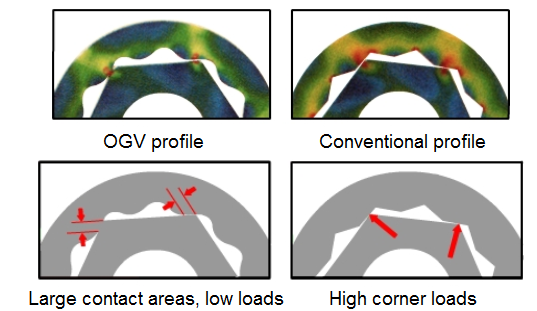
Thanks to this profile, tightening is more powerful and stresses are reduced, as contact areas with fasteners are larger.
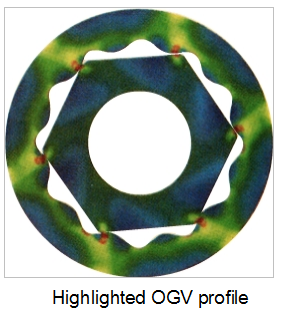
The 12 point (or sometimes six) configuration is generated by a series of successive radii. Such a “wave” has the effect of increasing the contact area between the socket and fastener. Moreover, the contact points are moved away from the corner of the fastener. Stresses are thus relieved. As contact areas are larger, tightening is more efficient.
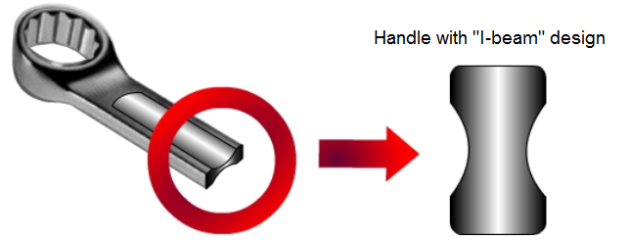
Generally, handles have the "I-Beam" design.
This design is ergonomic and moreover improves the tool toughness while decreasing up to 30% of its weight.
Professional spanners are forged from high grade alloy for added strength and durability. They are usually drop-forged, so as to ensure uniform grain structure. They undergo a controlled heat treatment to reach optimum wear characteristics without being brittle.
Jaws and rings are broached for a better accuracy and a prolonged life-time.
Precision trimming, broaching, grinding and polishing bring the spanner to exact specifications. Plating is treated against cracking or peeling. It offers long lasting rust protection and shields the tools against corrosion.
For fixed (conventional) spanners, it is important to select the appropriate size spanner for the same sized bolt or nut. Once the correct size has been selected, the open end must be placed on the nut or bolt, and the spanner is to be twisted. One way tightens, the other way loosens.
2.3. Specific spanners:
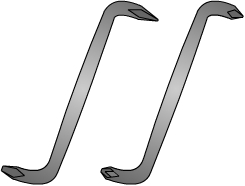
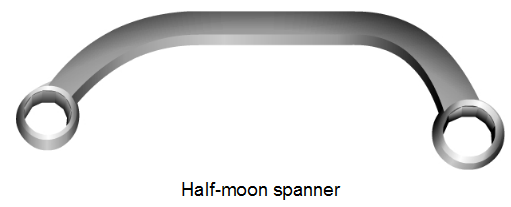
Some spanners are designed for driving bolts which are not easily accessible or which are unreachable with conventional spanners.
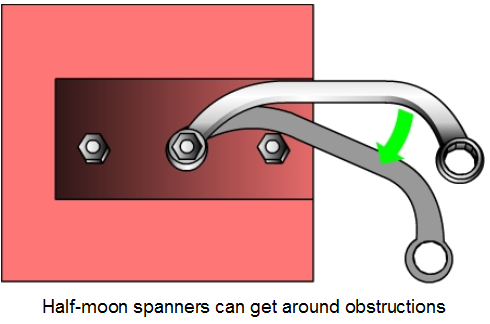
This is the case of half-moon spanners which have a bent handle.
These spanners are sometimes called “starter” spanners, as they work well on starters, or “obstruction” spanners, as they can get around obstruction.
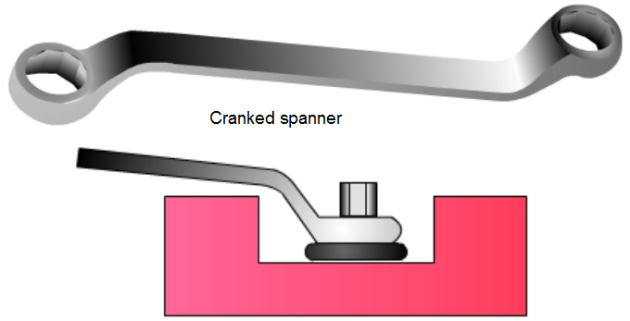
Cranked spanners have also a specific design. They have a deep offset for reaching over many obstacles.
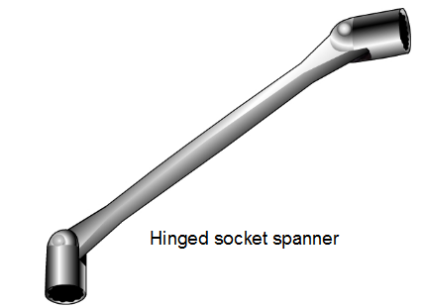
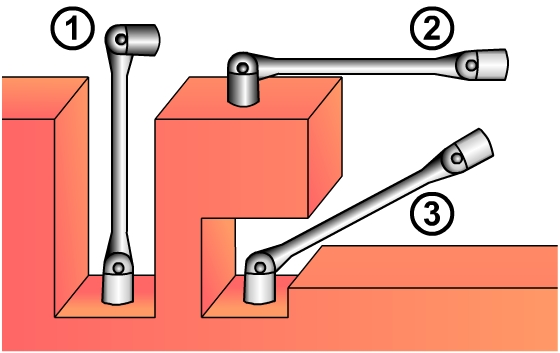
Hinged socket spanners are very handy.
This tool can be used in three different ways:
(1) as a screwdriver, with a small torque, when the handle is in line with the socket, to easily drive bolt in long confined and tight holes;
(3) as a cranked spanner, with a medium torque, when the handle crosses the socket axis at an obtuse angle, to drive bolts in cramped places;
or (2) as a conventional spanner, with a high torque, when the handle crosses the socket axis at right angle.
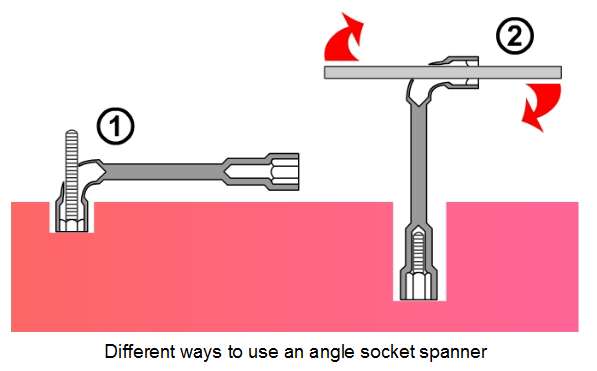
Some spanners are designed for developing high torques. This is the case of angle socket spanners which have their handles bent and holed at one end.
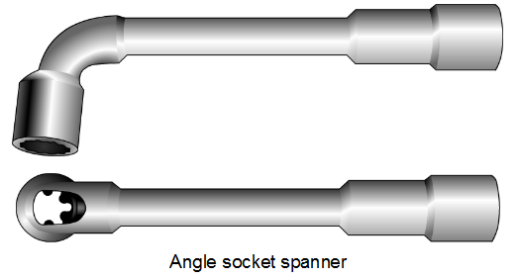
Such a design is very useful to screw nuts on threaded shanks (1) and can be used combined with an extension (2) as a sliding T-handle, to gain extra-torque.
Box spanners are made up of a hollow handle. The handle is usually twisted at right angle.
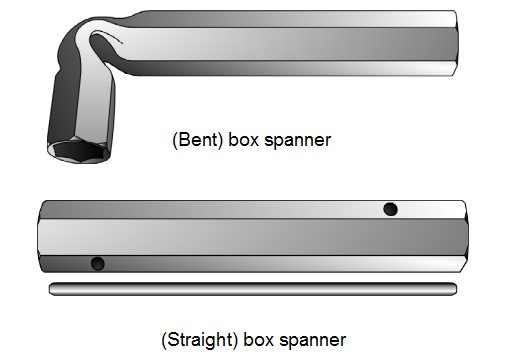
Sometimes, box spanners are not bent. These straight box spanners have a perforated body. The tool is to be used combined with a shank to exert torque. Box spanners drive easily nuts on long threaded shanks. They are very resistant and can undergo high torques.
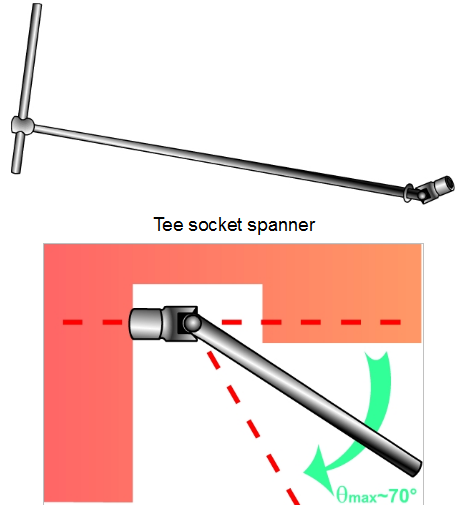
Tee socket spanners have a long think shank equipped at one end with a pivoting socket. Lever arm is significant and can develop high torques. The socket can swivel at a maximum angle of around 70°.
When inserted inside the socket, the bolt is maintained in position. This tool is thus essential for tight working in hardly reachable places.
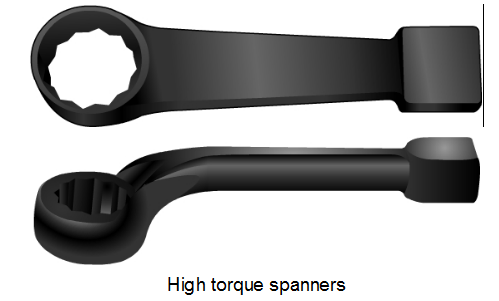
High torque spanners are designed for tight screwing or powerfully unscrewing large bolts on heavy structures. They are used with a sledgehammer or a pneumatic drill. Their shank can be straight or bent.
Some spanners have very practical design that permit a quick and easy use. This is the case of flare nut spanners. These spanners have almost the same design as conventional ring spanners, but their ring-head is partially open, so that bolts are easily inserted.
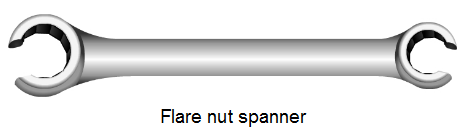
Although they are very handy for quickly working, flare nut spanner cannot undergo torques as high as conventional ring spanners.
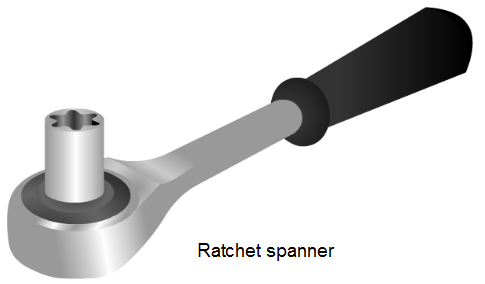
Another example of spanners especially designed for quickly working are ratchet spanners. Ratchet spanners work the same as fixed spanners, except they have sockets.
These spanners can be used with only one hand. Moreover, bolts do not have to be removed from the spanner to be screwed. Ratchet spanners come in a large selection of sizes and can be used with a variety of drivers, some having 11 different sizes. Like fixed wrenches, the socket must fit the nut or bolt exactly, so it does not strip the bolt.
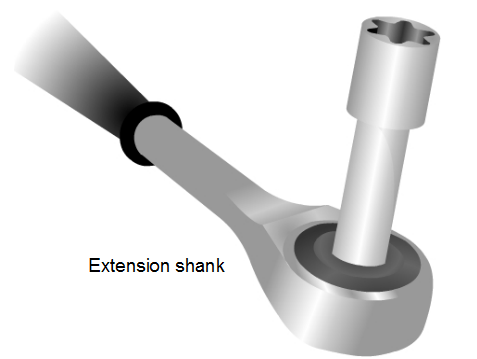
An extension shank can equip these type of ratchet spanners. They can be used in that way to work in confined spaces.
Drivers are available with a ratchet mechanism that permit removal and attachment of sockets and that allow for quick operation in both the clockwise and counter-clockwise direction. Thus, fasteners can be reached in awkward places.
Ratchet drivers permit to quickly operate fasteners.
A locking mechanism grips the detachable socket (driver). Locking and unlocking are easy.
The ratchet spanner is not equipped with any clockwise or counter clockwise devise.
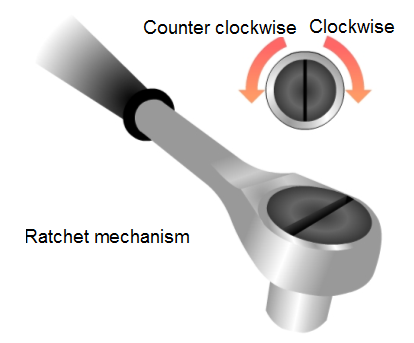
This kind of ratchet spanner tightens and loosens when turned over (or vice versa).
Variable opening spanners (also called adjustable spanners) are very versatile, as they can be adjusted to fit any bolt or nut. They should be used where it is not practical to use a fixed-end spanner or when several fixed-end spanners would be required. However, they cannot permit to reach cramped spaces and are not designed to withstand high torques.
Adjustable spanners operate the same way as fixed spanners, except it can be adjusted to fit the nut or bolt.
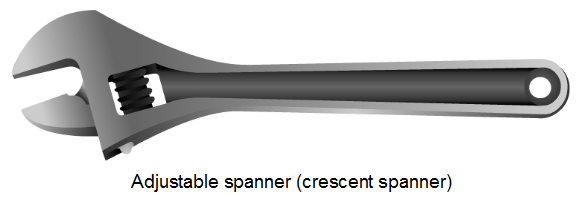
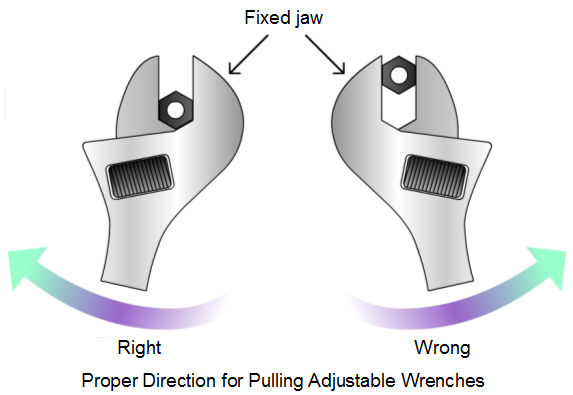
The adjustable (crescent) spanner is a useful all-around spanner. The usefulness comes from its capability of fitting odd-sized nuts. One jaw of the adjustable open-end wrench is fixed and the other one is moved along a slide by a thumbscrew adjustment. By turning the thumbscrew, the jaw opening may be adjusted to fit various size nuts. Crescent spanners come in varying sizes. The size selected for a particular job is dependent upon the size of nut or bolt head to which the spanner is to be applied. The direction of use for a crescent wrench is important. Using the wrench in the wrong direction will place too much pressure on the adjustable jaws and will cause the wrench to wear out prematurely or break. Figure is an example of the proper direction for pulling adjustable wrenches.
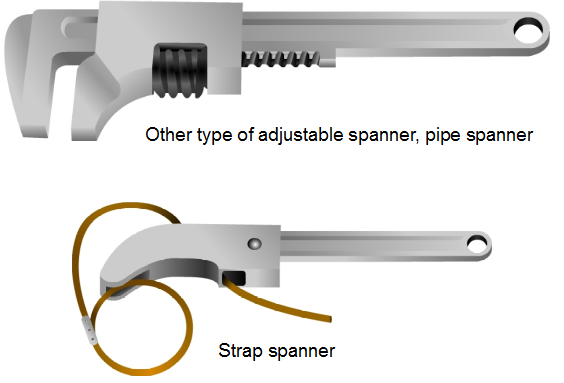
The pipe spanner is designed to be used on pipes or similar round surfaces. The surface of the jaws on the spanner has sharp cutting teeth used to grip the pipe. When the wrench is placed around the pipe, and pressure is placed on the handle, the wrench clamps onto the pipe. This wrench should never be used on fasteners or any equipment with a surface that must not be damaged or marred.
The chain spanner and strap spanner are other forms of a pipe spanner. The chain or strap is wrapped around the pipe and then fitted onto the hook at the end of the handle. When pressure is transmitted to the handle, the teeth at the end of the handle presses into the pipe and the chain or strap tightens on the pipe. This spanner is used mainly in confined areas where ordinary pipe spanners would not fit.
Finally, some spanners are designed for live working . Their inner part is made of steel or alloy and they are multi-coated with insulating compounds.
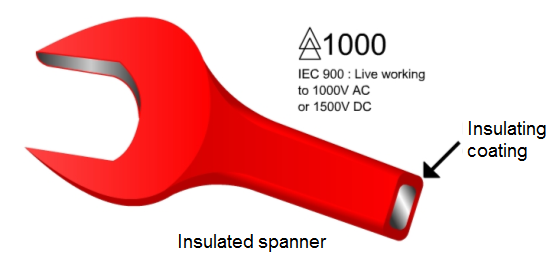
Such an insulation is suitable for work on parts under or near voltage of up to 1000 alternating voltage and 1500 direct voltage respectively. These spanners are conform to IEC 900.These spanners are individually tested to 10,000 V. It should be however noted that insulated adjustable spanners are not recommended to use for work under voltage.
Torque / tightening requirements:
A force F (in Newtons N) applying to a lever arm of length d (in meters m) generates a torque C the value of which is equal to :
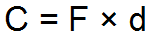
Torque units are Newtons per meters (N.m).
The tightening torque (or load torque) CS is then the force F exerted on a bolt by a spanner, multiplied by the lever arm d.
“Preload” is the name given to the force (FO), expressed in Newton, which is exerted on two pieces bound together by a bolt.
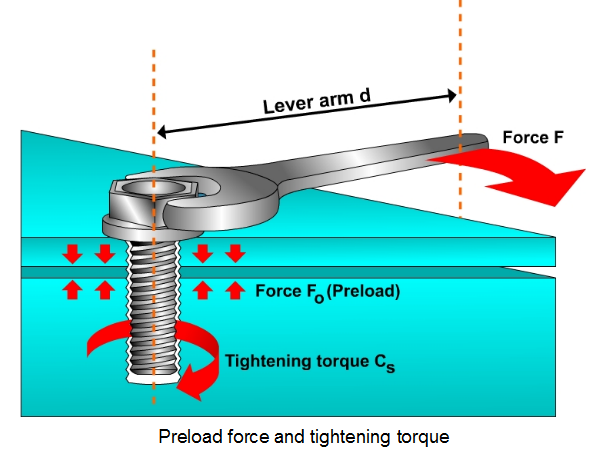
The preload is a function of the tightening torque exerted on the bolt and of the relating friction coefficient (mu-factor) .
Only an appropriate preload provides a reliable assembly. Obviously, if the preload is too weak, the assembly may work loose, and if the force is too strong, the assembly and fasteners may get out of shape or be damaged.
Usually, the value of tightening torque corresponding to a given screwing is indicated. If not, some engineering tests in laboratory are to be performed in order to determine the most accurate value. Nevertheless, for lack of specified values and if laboratory-testing is not feasible, it is always possible to refer to technical standards in force in the country.
Tables set out tightening torque (and therefore load force) values calculated in terms of various parameters:
bolt quality, (quality 12.9 is the best)
bolt shank diameter,
bolt head size,
bolt pitch,
friction coefficient.
Correct use / Safety:
The correct use of open-end and ring-end spanners can be summed up in a few simple rules: The spanner must be chosen depending on the work to perform and on the bolt to screw (size, quality ...).
Beware of not using a spanner the size of which is given in mm with bolts in ounces. The tightening torque must also be taken into consideration. The bolt must perfectly fit into the spanner head.
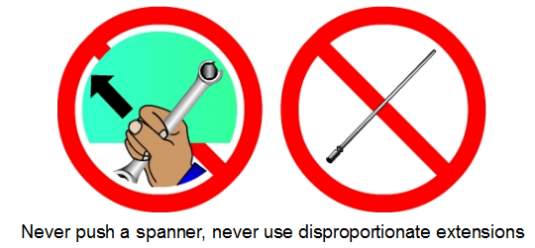
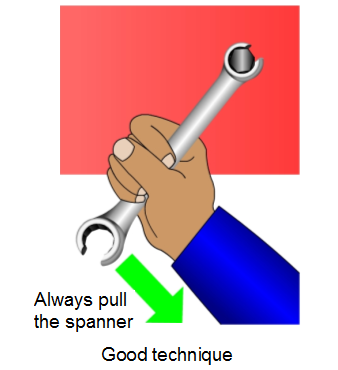
Always ensure the spanner is seated squarely on the flats of the nut. Then, the spanner handle must be firmly seized hold with the palm of the hand. It is safer to pull the spanner instead of pushing it. If it is impossible to pull the spanner and you must push, do it with the palm of your hand and hold your palm open.
Safety goggles should be worn while working.
The spanner should not be grinded, welded or overheated.
It is important to check that the tool and bolts are in good condition before performing any piece of work.
Never use a spanner as a hammer!
The torque capacities of the spanner must not be exceeded. Never use an extension on a conventional spanner. Never hammer a conventional spanner (but use high torque spanners). The use of an artificial extension (such as a pipe "cheater") on the handle of a spanner can break the spanner, spoil the work, and hurt the user. Instead, get a larger spanner or a different kind of spanner to do the job.
Spanners should be kept clean and free of oil. Dirt and grit prevent them from seating firmly around a fastener. Oil and grease make them slippery.
Never use a spanner opening that is too large for the fastener. This can spread the jaws of an open-end spanner and batter the points of a ring or socket wrench. This can also spoil the points of the nut or bolt head.
Match the spanner to the job: use ring or socket spanners for heavier jobs, open-end wrenches for medium duty jobs, and adjustable wrenches for odd-sized fasteners.
Do not try to repair ring or open-end spanners. Such attempts may prove dangerous. Discard any spanner with spread, worn, or mutilated jaws on the open end or with rounded or damaged points on the ring end. Also discard spanners with bent handles.
3. PLIERS AND CUTTERS:
Pliers are often thought to be fairly basic tools, but there are a large number of different models, all designed for different purposes and the best performance will be achieved by using the right pliers.
They can be divided into two categories, one for gripping, turning and twisting and one for cutting objects (sometimes people speak of cutters instead of pliers in this last case). A few models such as engineer's combination pliers combine both functions. By the name of pliers are then attached tools which have different functions; It is thus imperative that the right tool be selected to perform a given job.
3.1. Design / ergonomics:
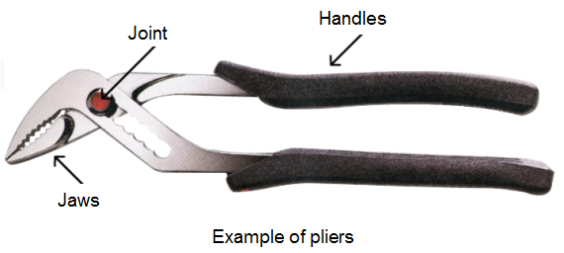
Pliers are basically composed of a pair of pivoted jaws. They come in a variety of shapes and lengths. The size is indicated by the overall length (usually from 5 to 10 inches).
Some are available with plastic-coated or cushioned handles for comfort (the cushion should not be relied upon for insulation during electrical use).
The better grades of pliers are made of drop forged steel to withstand hard usage, as it ensures uniformed grain structure for strength and durability. Heat treatment provides a positive cutting edge without making them brittle. Chrome is usually plated to prevent rust. Surfaces are machined to close tolerances.
The body and handles should be hardened and then well tempered back. On cutting pliers the edges are then induction hardened. On combination pliers only the cutting edge is induction hardened.
The geometry of the cutting edge is important, for the bigger the angle, the stronger the cutting edge, but the narrower the angle, the easier it is to cut.
Quality pliers must have a joint which is firm and does not wobble. A good way to test a pair of pliers is to try the joint for ease of use and lack of sloppiness. Traditionally there were three main types of joints: box joints, lay-on joints and slip joints.
Professional pliers are manufactured to meet all national and international standards.
3.2. Types of pliers:
There are many different types of pliers available. Each type of pliers has a specific purpose or use.
Pliers fall within two general categories: gripping pliers and cutting pliers. Within each of these categories may be encountered solid-joint and slip-joint pliers.
Gripping pliers are intended to grip objects. They can be long to grab onto objects, or even have curved jaws to reach hard places. By grabbing the handles and squeezing, the object is held on.
Cutting pliers come in different strengths to cut thin pieces of wire, or thick strips of metal. They work the same as gripping pliers but have sharp ends; Wire cutters may be in a side, end or diagonal configuration. Some cutting pliers are made with a spring in the handles to open them automatically after each cut. Side cutters have a cutting blade on one side only and are available in long-, curved- and short-nose types. End cutters have cutting blades on the end and are used to make sharp, clean cuts through wire, bolts and rivets. Diagonal cutters have two cutting blades set diagonally to the joint and/or handles. Shears have cutting edges that pass each other.
Solid joints pliers can be of two different kinds: their joints can be either box joints, or lay-on joints.
Box joints are formed at the time of forging when one handle is literally forged around the other to provide a box joint traditionally considered to be the firmest.
Lay-on joints, sometimes called lap joints, are formed by one handle being laid onto the other and riveted. Recent developments have meant that very high quality results can be achieved with lay-on joints, provided that the rivet is strong, well fitted and of the correct shape in order to provide a very firm hold. Top quality lay-on joints are now considered up to the standard of box joints which are now seldom made.
Slip-joint pliers are also called adjustable pliers. They have a sliding joint, so that the tool can be adjusted to have wide or narrow jaws. The pivot slides to set the opening.
Slips joints are forged similar to lay-on joints except that the hole for the rivet is elongated and the rivet not tightened so that the two halves can be opened further to provide a wider jaw opening.
Some adjustable pliers are called locking pliers, for their opening can be locked in place. When the appropriate width is obtained, the lever has just to be tightened for this tool to be locked. Locking pliers are especially helpful if another tool or object must be held in the other hand.
a) Gripping pliers:
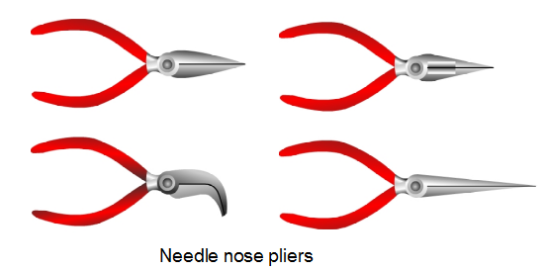
Needle nose pliers have very narrow pointed jaws, as their name suggests. The jaws, when serrated, are lined with very fine teeth or ridges.
Needle nose pliers are suited for twisting and bending light to medium wire, for working on delicate components, and for doing similar light jobs in very tight places. Special care must be taken not to use needle nose pliers on heavy wire or large objects for which they are not designed. As shown in next figure, some needle nose pliers can have partially cutting jaws.
Channel lock pliers suit for gripping objects of various sizes while keeping their jaws practically parallel.
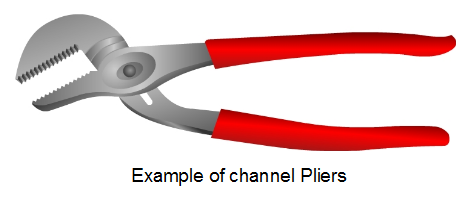
Channel lock pliers are available with both serrated and non-serrated jaws. Those with non-serrated jaws were once called water pump pliers; the primary function was to grip opposite flats of gland follower nuts on water pumps so that the nuts could be tightened or loosened. Although they are not often used for this purpose today, smooth-jawed channel lock pliers still exist as a useful tool for gripping unusual size nuts, bolts, and other objects.
Crimpers, or crimping tools, are used to attach wire ends to wires. They may be hand-operated or hydraulic. Hand-operated are typically the ratchet type which will not open until the full, closed stroke is completed. At the end of the closed stroke, the jaws will make a dot or impression on the wire end indicating that the tool fully closed.
b) Cutting pliers
Diagonal cutting pliers, often called dikes, are used for cutting light material, such as wire and cotter pins, in areas which are inaccessible to larger cutting tools.
Diagonal cutters are made in several patterns ranging from the high-leverage, heavy duty-pattern down to the midget pattern for electronic work. They are available with and without a top bevel on the knives for flush cutting. Some have wire skinning holes, and some have coil springs to open the jaws. Handles may be plastic dipped, slip-on moulded plastic, or plain.
Flush cutting pliers are simply diagonal cutting pliers with a top bevel on the knives for flush cutting.
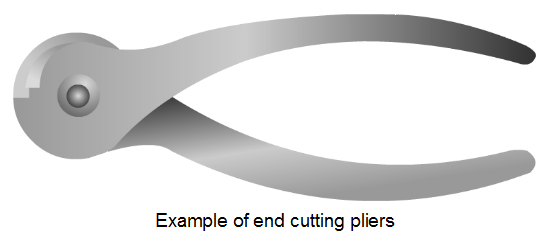
End cutting pliers, or nippers, are available in a variety of sizes. The cutting edges on these pliers are on the front of the jaws, rather than at the side.
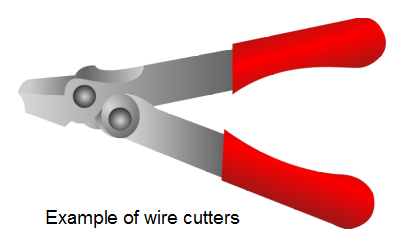
Wire Cutters and Strippers
Most common wire strippers can be used with a variety of different wire sizes.
c) Combination pliers
So called because they are a combination of gripping and cutting pliers. Often called engineer's pliers, or, if insulated, electrician's pliers, they are strongly made with flat serrated jaws for gripping flat surfaces and a rounded section in the jaws for gripping tubes and pipes. Behind the gripping section of the jaw are the cutters. Also included in the main body of the pliers is a wire cropper for cutting thin wire and cable.
Lineman pliers are very useful for holding, bending, and cutting thin materials or small wires. The Lineman Pliers feature high leverage handles with textured grips, milled jaws assuring a powerful grip, hardened cutter and insulation crusher between pliers handles.
Lineman pliers have a square nose and serrated jaw tips. The jaws are hollowed out on one side, just forward of the pivot point of the pliers. Opposite the hollowed out portion of the jaws are the cutting edges. The handles may be plain, slip-on moulded plastic, plastic-dipped, or high dielectric insulated. High leverage patterns are also available, as are pliers incorporating sleeve twister and threaded bolt holding openings.
Lineman pliers should never be used to grasp large objects, tighten nuts, or bend heavy-gage metal, since such operations will spring the jaws.

d) Specific pliers:
Insulated pliers: These should have properly tested heavy duty insulated handles. The user should be particularly careful to check that he or she is using a proper pair of insulated pliers and is not confusing insulation with plastic sometimes applied for comfort on non-insulated pliers. These are sometimes called velvet grips.
Velvet grips are fitted purely for comfort. The user should be particularly careful to note that the velvet grip is not insulated and should not be confused with insulated pliers.
Electronic and instrument pliers: There is sometimes confusion between electronic pliers and instrument pliers. This is probably because they are both small (approx. 41/2in long).
Electronic pliers are designed for regular frequent use, often on production lines and often for cutting thin gauge but very tough electronic wire. The electronic plier is more expensive because it is more robust and usually subjected to much greater production line use.
Instrument pliers are for small delicate work and often used by model makers.
3.3. Correct use / Safety:
The following basic safety rules should be followed when using pliers, cutters, pliers, strippers and crimping tools :
Always wear safety goggles. When wire and metal are cut, fragments often pop off, presenting a serious hazard to the eyes. This hazard can be minimized only if adequate eye protection is worn.
Use the proper tool for the job. For example, attempting to cut tempered or hard metals such as spring wire or stainless steel will distort the cutting edges of the tool and possibly spring (misalign) the joint.
If work cannot be cut by exerting pressure on the handles with only one hand, a larger, stronger cutting tool should be used. Work that requires two hands to cut will overstrain the jaws and the joint. Because the cutting edges of most cutters cannot be repaired or sharpened, ruining them often renders the tool completely useless.
Be certain to get maximum mechanical advantage when cutting by placing the work as far back as possible between the cutting edges. The closer the work is to the joint, the more pressure is present to cut.
Do not hold work with cutters.
Always wear gloves and safety glasses when working with cutters and strippers.
Hold the wire that is to be cut off to keep the piece from becoming a flying "missile."
4. HAMMERS AND MALLETS:
The tool nearly everyone buys first is a hammer. And because hammers are so common, it's easy to take them for granted--after all, what could be simpler than pounding nails? Like most tools, though, there's more here than meets the eye-both in the tool's design and its use.
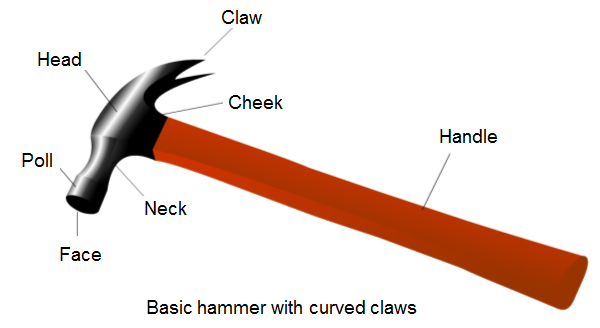
While there are many different kinds of hammers, the one you should keep on hand for carpentry, repairs and general maintenance is a claw hammer. You'll find two kinds at your local hardware store: those with curved claws and those with claws that are nearly straight. A curved-claw hammer is best for general-purpose use around the house and shop because the claw design provides good leverage for pulling nails.
The straight-claw version, often called a framing or ripping hammer, is more common at construction sites, where work frequently needs to be dismantled. The straighter claw can be driven between boards so they can be pried apart. This feature, though, reduces leverage for pulling long nails.
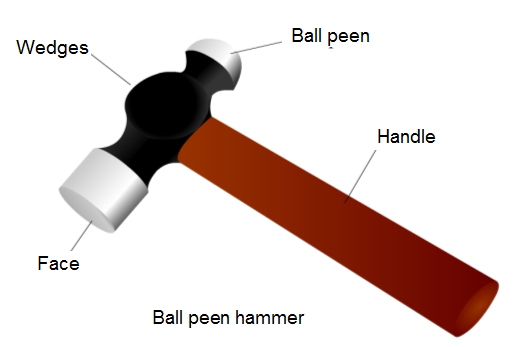
Apart form curved and straight claw hammers, other design are available. The ball peen hammer is used for machining and maintenance use. It has a ball which is smaller in diameter than the face. It is, therefore, useful for striking in areas that are too small for the face to enter.
The peen of a ball peen hammer gives this tool its name. The round surface is ideal for peening (flattening) rivets and shaping metals because the shape of the peen allows the hammer to strike at a single point on the work. The face of the hammer is rounded, making it ideal for driving metal pins as well as striking chisels, punches, and other metal working tools. Due to the rounded face, the ball peen hammer should not be used to drive nails.
Ball peen hammers are made in different weights, usually from four ounces to three pounds.
Other factors to consider when choosing a hammer are weight, the shape of the face and the type of handle. Hammer size is designated by the weight of the head, which varies from 7 to 28 ounces. For average work, a 16-ounce hammer will work fine. Heavy 20- to 28-ounce hammers are the choice for construction work. Keep in mind that while a heavy hammer will drive nails faster, more energy is required to swing it. If you're comfortable with a lighter hammer, you'll probably get the work done just as fast, with less wear and tear on your arm, wrist and hand.
The head of the hammer has either a flat face or a crowned, or bell, face. The slightly convex surface of the bell face permits driving a nailhead flush with the wood without contacting and marring the surrounding area.On the other hand, this type of face requires more care because the hammer head can slip off the nail as it's struck. Flat-face hammers are more common in construction work where surface marring is of little concern.
The traditional hammer handle is made of hickory -a strong and resilient wood that effectively absorbs the shock of the hammer striking a nail. Steel and fiberglass handles are stronger than wood and virtually eliminate the problem of loose heads and handle breakage.
4.1. Using a hammer:
Though swinging a hammer is not complicated, how you hold the tool affects both the power transmitted to the nail and the amount of control you have. To get the most out of each stroke, grip the hammer near the end of the handle. For light nailing, move your hand closer to the head to reduce the force of each blow and increase accuracy.
To drive a nail, first rest the hammer on the nail with the face centered on the head. Then, tap lightly to start the nail. Focus on the nail and swing the hammer head in an arc so the nail is struck squarely
For most work, swing the hammer from the elbow and shoulder, with little or no pivoting motion at the wrist. However, for very light work, or when using a small hammer, swinging through your wrist provides the necessary force with greater accuracy.
While common nails are driven flush to the surface, finishing nails are usually recessed. To set a finishing nail, first drive it until the head is nearly flush. Then, center the point of a nailset on the nailhead and strike the nailset to drive the nailhead slightly below the surface.
To pull a nail, slide the claw under the nailhead and pull on the handle until it's vertical. If necessary, slip a scrap of wood under the claw to increase the leverage. Continue to pull until the nail is withdrawn. The block of wood also helps to prevent marring finished work.
When a nail-head breaks off, use a soft-faced mallet to drive the inside edges of the claw into the body of the nail. Never use another hammer in place of the mallet. The hammer heads could shatter and cause serious injury.
4.2. Nail tips:
To avoid splitting the wood, place nails away from the ends of the stock. If you must nail near an end, bore a small pilot hole for the nail before driving it. Another way to reduce splitting is to slightly blunt the nail point. This causes the nail to crush the wood rather than wedge the fibers apart. When nailing hardwoods, such as oak or maple, always bore pilot holes to avoid splitting and to reduce the chance of a bent nail.
4.3. Mallets:
Mallets are soft-faced hammers. They are used for driving wooden stakes and pins, striking wooden handled chisels and gouges, tapping equipment into proper position, shaping metal, or any job where a hard-faced striking tool could mar or otherwise damage the work. The heads of mallets can be made of wood, plastic, hard rubber, rawhide, or other soft material.
Although mallets and hammers are both used in roughly the same fashion (selection and inspection are basically the same for hammers and mallets), the mallet's soft striking surfaces require special care and attention. Mallets should never be used to drive nails, pins, bolts, or other hard fasteners, and they should never be used to strike metal handled tools or cold chisels. Using a mallet to strike hard surfaces will damage the soft material of the striking surface.
Mallets must also be stored properly. Materials like wood and rawhide can dry out and shrink if they are left in the sun or near a heat source, and this would weaken the mallet. The condition of such materials should be preserved by keeping them away from sunlight and by oiling them occasionally to preserve their moisture content. Mallets must also be kept away from water, which, if absorbed, can lead to rotting of the material.
4.4. Safety:
The following safety precautions apply generally to all striking tools:
Check to see that the handle is tight before using any striking tool. Never use a striking tool with a loose or damaged handle.
Always use a striking tool of suitable size and weight for the job. Do not use a tack hammer to drive a spike, nor a sledge to drive a tack.
Discard any striking tool if the face shows excessive wear, dents, chips, mushrooming, or improper redressing.
For striking another tool (cold chisel, punch, wedge, etc.), the face of the hammer should be proportionately larger than the head of the tool. For example, a 1/2-inch cold chisel requires at least a 1-inch hammer face.
Never use one hammer to strike another hammer.
Do not use the end of the handle of any striking tool for tamping or prying; it may split.
Always wear gloves and safety glasses when using a hammer or mallet.
5. CHISELS:
While there are many woodworking hand tools that are useful in a modern shop, there are only a few that are truly indispensable.

Near the top of the list is the chisel. Here's a tool that does it all – from quickly removing waste wood in large chunks, to carefully paring away thin shavings for that glove-like fit. And you'll find chisels used in just about every area of woodworking, from trim carpentry to woodcarving to furniture making.
There are many types and sizes of chisels, each designed for a specific job. If you're getting started, consider buying a 4-piece set made up of 1/4-, 1/2-, 3/4-, and 1-in. bevel-edged bench chisels with blade lengths of 4 to 6 in. Plastic handles are a good idea because they are comfortable to hold and they stand up to being struck with a mallet. If you only buy one, get a 3/4-in. chisel. Be sure to buy a reputable brand because quality steel means the tool will take a sharp edge and hold it longer.
5.1. Using the chisel:
If you've never used a chisel, there are two basic rules to remember. First, always keep the tool pointed away from you when in use-if the chisel slips, the worst place to be are at the cutting end. Second, always make sure that your tool is razor-sharp.
For many operations, the chisel is held with both hands–one on the handle to apply cutting pressure and the other on the blade to guide the cut. When greater cutting force is required, shift the guide hand to the chisel handle and use a mallet to strike the handle end.
Whenever possible, cut with the grain–the grain should slope up and away from the tool–to achieve a clean, controlled cut. When the chisel is driven against the grain, the bevel tends to wedge into the wood, splitting out large chunks in an uncontrolled manner.
Whether the bevel faces up or down depends on the nature of the cut. Generally, the bevel is up for paring–slicing off waste in thin layers–and down for roughing cuts.
5.2. Basic cuts:
To cut a notch or shallow mortise at the edge of a board, start by laying out the notch edges with a knife groove. Then, with the bevel facing the waste area, set the chisel edge in the scored line, hold the chisel vertically and tap it with a mallet to make incisions around the perimeter. With the bevel down, make slanted cuts from the stock face to the perimeter incisions to form the notch walls. After bringing the angled perimeter cuts to the desired depth, turn the chisel bevel up and cut across the grain to remove most of the waste. When the notch has reached its approximate final size, use light cuts to bring it to the exact size and depth you need. When paring endgrain, you'll find that the cut goes more easily and smoothly if you use semicircular sweeps, with the trailing edge of the blade doing the cutting. Use a wide chisel, bevel up .
As an aid when cutting a rabbet to a precise depth, it helps to use a block whose thickness matches the rabbet lip as a guide. Clamp the work and the guide block to your bench and hold the chisel flat against the guide for the final cuts .
The quickest and easiest way to cut a deep mortise is by first boring a series of overlapping holes using a drill bit that's slightly smaller than the width of the cavity. Then use the chisel to shave away the waste between the holes . When working in corners, always make crossgrain cuts first to prevent long-grain splitting.
To trim along a concave curve, use a chisel that is slightly wider than the thickness of the stock. With the bevel down, press down on the blade while pivoting down on the handle and pushing forward.
5.3. Sharpening:
A sharp cutting edge is essential for clean and fast cutting, as well as for personal safety. Not only does a dull tool create a coarse cut, but the extra force required to drive the tool can lead to loss of control.
Maintain a keen edge on a chisel by regularly honing it on an oil or water stone. The cutting edge bevel is usually 25° to 30°, but you don't have to hone the entire bevel. Instead, hone a small secondary bevel at the tip to a slightly steeper angle than the main bevel.
Seat the main bevel firmly on the stone, then raise the chisel handle slightly higher, about 5°. Move the blade back and forth until a wire edge forms on the back of the blade. Then, turn the blade over, lay it perfectly flat on the stone, and slide it a few times to remove the wire edge. As a test for sharpness, pare across end grain. You should hear a crisp sound as a clean, curled shaving peels away from the wood.
6. SCRIBES AND PUNCHES:
A punch is a tool used to exert a significant amount of striking force on a very small area. All punches are made to be struck with ball peen hammers (which have rounded faces specifically designed for use on striking tools) and are, therefore, made of hardened steel. They vary in design and purpose, with some of the more common types include center punches, prick punches, drift punches or drifts, pin punches, alignment punches, and hole (gasket) punches.
Scribes are hardened steel tools used to make shallow marks on metal. They are usually long and thin with a gripping surface on the body. Scribes are used with rules to make straight lines on metal for punch locations or to mark lines for cuts. Scribes should never be struck.
6.1. Prick punches and center punches:
Prick punches and center punches are primarily designed for making marks or indentations in metal.
The prick punch, shown in next figure, is a long, tapered punch beveled at the tip to form a point. It is a light to medium duty tool used to make location marks on equipment.
Making a set of location marks on a component such as a split casing allows the technician to take the casing halves apart and return them to their original position later.
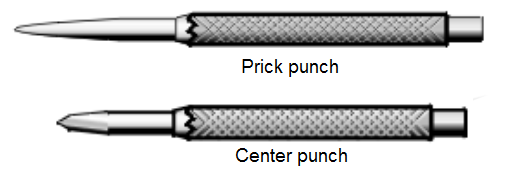
Center punches are similar to prick punches, but they are generally thicker and more suitable for heavy duty work. Their primary purpose is to make indentations in metal deep enough to give drill bits a true start. Without the indentation made by a center punch, a drill bit is liable to "walk" across the surface of the work instead of drilling a hole.
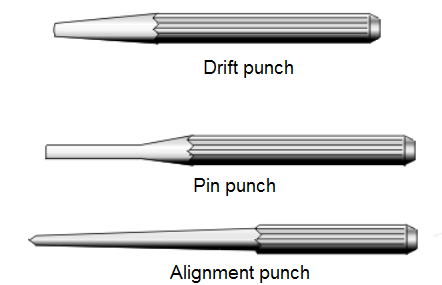
6.2. Drift punches, pin punches, and alignment punches:
Drift punches (or, simply, drifts), pin punches, and alignment punches are related because their primary use is removing and inserting alignment pins.
Drift punches are heavy, tapered punches with blunt tips. They are used primarily to drive alignment pins out of equipment, and they are available in a variety of sizes to match the diameters of pins.
The drawback to drift punches is that in order to construct them with sufficient strength to withstand heavy hammer blows, they have to be thick and tapered. This tapering prevents them from following an alignment pin through its hole. To complete the job that a drift starts, a pin punch must be used.
Pin punches, like other punches, are manufactured in various sizes and diameters. Unlike drifts, which taper from a narrow tip to a thick body, pin punches have uniformly narrow shanks that allow them to reach all the way through alignment holes and other circular recesses. Because of their narrow shanks, however, they are not strong enough to be used to break alignment pins free.
Alignment punches are used to reinstall alignment pins. An alignment punch is long and gradually tapered. It is used to align matching holes in components so that alignment pins can be inserted easily.
Next Figures give an example of an alignment punch, pin punch, and a drift punch.
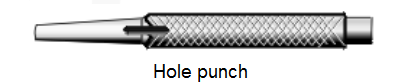
6.3. Hole punches:
Hole punches are used to cut circular holes in gasket material, rubber, soft plastics, and even soft metal. Instead of pointed or blunt solid tips, hole punches have sharp-edged circular ends. Hole punches usually come in sets that include a variety of different size punches for cutting various size holes.
6.4. Safety:
The following basic safety rules should be followed when using punches:
Be certain that the work is held steady. The work should be held in a vise or clamp to ensure that it does not slip when the punch is struck by the hammer. Accuracy is especially important when making starting indentations for drill bits.
When making an indentation with a center punch, always mark the exact spot where the indentation is to be made before attempting to make it. This ensures accuracy.
Match the hammer to the size of the punch. The face of the ball peen hammer should be no more than twice the diameter of the striking surface of the punch. Otherwise, the hammer is too small (and unable to supply sufficient force) or too large (thereby possibly damaging the punch). Prick punches should be struck with light or medium weight ball peen hammers; center punches should be struck with heavier hammers, since they must make deeper indentations.
Never use a carpenter's hammer to strike metal working punches or chisels. The hammer face is hardened, which can fracture and send hazardous metal chips flying.
Always wear gloves and safety glasses. Any time metal strikes metal, there is the chance that bits of metal will fly. This requirement is so important that some manufacturers stamp it on the sides of their punches.
7. HACKSAWS AND FILES:
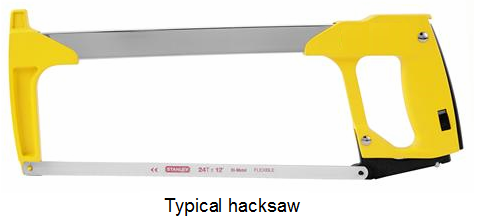
7.1. Hacksaws:
Hacksaws can be used to cut practically all types of metals, with the exception of tempered steel. To determine whether a metal object can be cut with a hacksaw, test it with a file. If the metal cannot be filed, it cannot be cut with a hacksaw.
Good work with a hacksaw depends not only upon proper use of the saw, but also upon proper selection of the blades for the work to be done. Blade selection involves design (shape), coarseness (number of teeth per inch), and degree of toughness and hardness. The user is primarily concerned with coarseness when selecting a blade.
Hand hacksaw blades are generally available with 14, 18, 24, and 32 teeth to the inch.
14 tooth:
For cutting stock 1 inch or over in thickness and for cutting soft materials.
18 tooth:
For general shop use, when the same blade is used on several jobs.
24 tooth:
For 1/16 to 1/4 inch in thickness, such as pipe, angles, and small drill rod.
32 tooth:
For cutting stock up to 1/16-inch in thickness, such as sheet metal, light tubing, and cable.
A hacksaw blade cannot be reset, sharpened, or ground. When dull or broken, it must be replaced with a new one.
The following basic safety rules should be followed when using hacksaws:
Check blade tension prior to use. This will minimize the possibility of blades breaking.
Mount the work in a vise. This will ensure you are working on a firm base.
Select the correct blade for the job to be performed.
Always wear gloves and safety glasses when using a hacksaw.
7.2. Files:
There is a large variety of files available for use. They can be used to sharpen shears, remove burrs, or mark or shape metal.
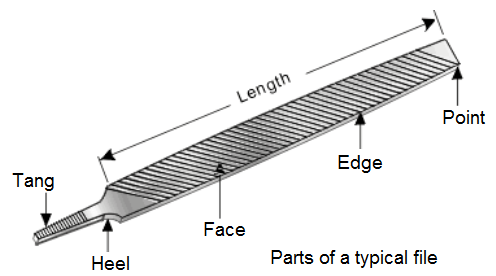
The proper use and care of files makes for a better and safer job. Files are hardened steel tools used in cutting, removing, smoothing, and/or polishing of metal. The major parts of a file, shown in Figure, are the tang, heel, face, edge, and point.
There are many shapes or styles of files available. The most common ones are the square, round, triangular, half-round, mill, and flat files. These shapes are shown in Figure.
Files are also classified according to their face, or to the cut of teeth as single cut and double cut.
The single cut file has a single set of diagonal, parallel rows of teeth. This type of file is best used for sharpening tools, finish filing, and draw filing. This is the best file for smoothing the edges of sheet metal.
The double cut file has two sets of diagonal parallel rows of teeth, one set criss-crossing over the other. The first set is called the overcut; the second set, on top of and finer than the first, is the uppercut. The resulting diamond shape gives fast cutting; it is used for quick removal of material and for rough work.
The single and double cut files are defined even further by classifying them according to the coarseness of their teeth. Common coarseness ratings are rough, coarse, bastard, second cut, smooth, and dead smooth.

The following basic safety rules should be followed when using files:
It is important to keep files clean of filings or chips which collect between the teeth during use. The teeth of a file should be brushed frequently with either a file card or a brush.
Always use a handle on the file. It is extremely dangerous to use a file without a handle. Wooden handles of various sizes are available and are easily installed.
Always wear gloves and safety glasses when using a file.
8. VISES AND CLAMPS:
Vises and clamps are used to hold pieces of material that are being worked on. Vises are usually fixed to a bench, table, or other work surface. C-clamps are light, portable, and widely used to temporarily hold objects together or secure lightweight objects for work.
8.1. Bench vises:
Although vises are available in a variety of types and sizes, most vises are intended for holding large or heavy objects or objects on which large forces must be exerted. As a result, most vises are too large to be considered portable, and they are generally found in relatively permanent locations, such as workshops.
8.2. C-Clamps:
C-clamps are light to medium duty holding devices that are far more portable than vises. It must be remembered, however, that clamps are not as strong as vises, nor are they designed to hold work as large or heavy as that which vises can hold.

C-clamps get their name from the shape of their frames. A screw device operated by a sliding bar is attached to one end of the frame. A small, flat anvil is located on the other end of the frame. Work is held between the anvil and the swivel disc on the end of the screw. C-clamps come in a variety of sizes and shapes. Because of this, a C-clamp can usually be found to fulfill any type of holding requirement. Figure is an example of a C-clamp.
8.3. Safety:
The following safety precautions pertain to clamps and vises:
Clamps are not as strong as vises. They are not designed to hold work as large or heavy as that which vises hold.
Rust and metal filing/debris can clog the threaded portion of a C-clamp. C-clamps should be properly cleaned and free of foreign material.
Jaws of a vise may damage pumps, valves, or other items being secured by the vise. Copper or lead jaws are required when working with material that can be damaged by steel jaws. Wood blocks can also be used to protect material requiring work.
Ensure that the vise is large enough to hold the material requiring work. Small vise jaws may not open wide enough to properly secure material.
Over-tightening a vise can crack or damage equipment. For example, angle iron may be tightened very secure while an electric motor requiring work on casting bolts should not be tightened as tight as angle iron