COMMON POWER TOOL TYPES
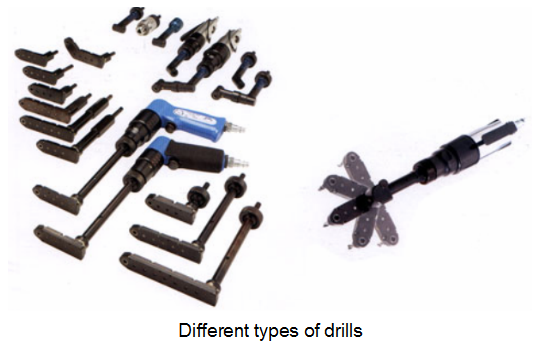
1. AIR DRILLS:
For the aircraft maintenance and repair work shop we really need a high speed drill (about 2,500+ RPM), which makes drilling quicker and easier. A variable speed drill is often easier to use. The electric and pneumatic power drill is common use. For safety reason, we chose the pneumatic power drills. Drills are used to cut holes in aluminum skin for rivets, special fasteners, and bolts.
1.1. Design/ Ergonomics:
The motor, which drives the drill, can be pneumatic (air-powered) or electrical. In aircraft repairing work, the air-driven motor is usually preferred because electrical lines can be accidentally cut while working in close quarters on an aircraft, and because all air motors have variable drill speeds and are more durable than most electrical motors. However, electrical motors are less expensive, and some of the newer models are battery operated.
1.2. Types of drills:
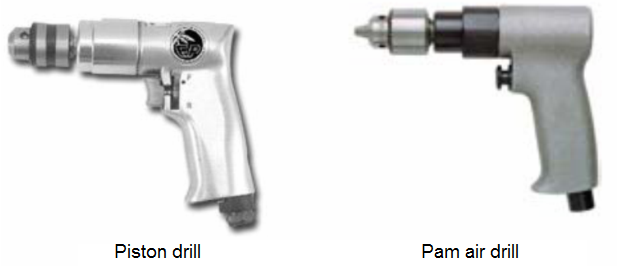
a) Pistol drills:
This is the most common type of drill which can use for repairing aircraft and other work, easy to hold and control speed, a variable speed drill is often easier to use, it can power by air (pneumatic) motor or electrical motor.
b) Palm air drills:
A powerful air drill that fits comfortably in the palm of our hand, light weight, high speed air drill that's small enough to fit into our pocket but it still has the power to take on any job, ball bearing construction.
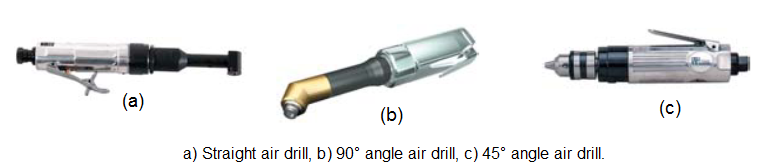
c) Other Types of Air Drill
For different work, we need different types of drill, there are three types of drills, Straight air drill, 90° angle air drill and 45° angle air drill. These types of air drill pack a lot of power into a very compact form. It delivers enough speed and torque to drill into most materials with ease. The head can fit into the tightest areas. Power is delivered by pneumatic motor.
1.3. Safety / Correct use:
Before installing or removing drill bits or other devices in a motor, make sure the air line or electric supply to the motor is disconnected. Always use safety glasses or face shield when drilling, and use a hair net if your hair can get close to the drill.
Prepare for drilling:
Install proper drill in the motor and tighten with proper size chuck key.
Plug in or connect air hose to motor inlet fitting (or connect electric power in case of electrical motor)
Start drill motor and check drill for wobble. The hole must be correct size If not we need to replace the bend drill.
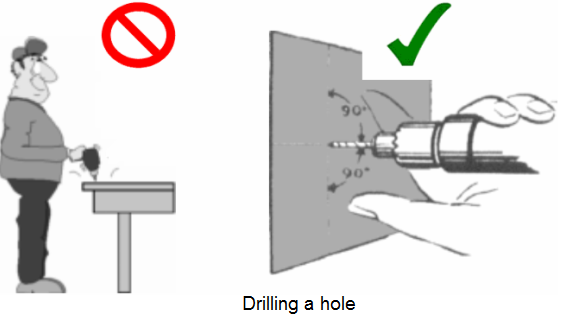
Drilling holes:
Hold drill motor firmly. Hold drill at 90-degree angle to the surface(s).
Start hole by placing point of drill on marked centerlines. With the fingers, turn the chuck until an indentation is made. (Omit this step when drilling through an existing pilot hole). We do not recommend prior center-punching, as this may indent the material.
Position thumb and forefinger to prevent the drill from going too far through the work, which can cause damage to items on the other side or result in an oversize hole. Adding a rubber washer (a small piece of rubber hose) by the shank will prevent damaging the material as you drill a hole through.
Drill the hole by starting the drill motor and exerting pressure on centerline of drill. Exert just enough pressure to start the drill cutting a fairly large size chip and maintain this pressure until the drill starts to come through the work.
Decrease the pressure and cushion the breakthrough with the fingers when the drill comes through. Do not let the drill go any farther through the hole than is necessary to make a good clean hole. Do not let the drill spin in the hole any longer than necessary.
Withdraw drill from hole in a straight line perpendicular to the work. Keep motor running while withdrawing drill.
2. POWER SCREWDRIVERS:
Like the hand screwdriver, the power screwdriver help us for working more easily and more power to driving and removing the screws, Power screwdriver use for assembles and installs preformed of wood structure and sheet metal.
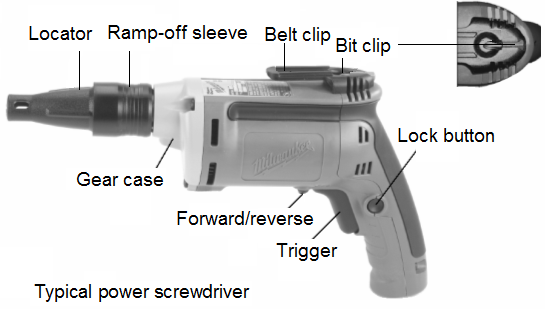
2.1. Design / ergonomics:
The screwdriver is equipped with a motor and the screwdrivers bits, the bit can change depend on different types. It should be the variable speed, reversible and power by electrical motor or the pneumatic motor.
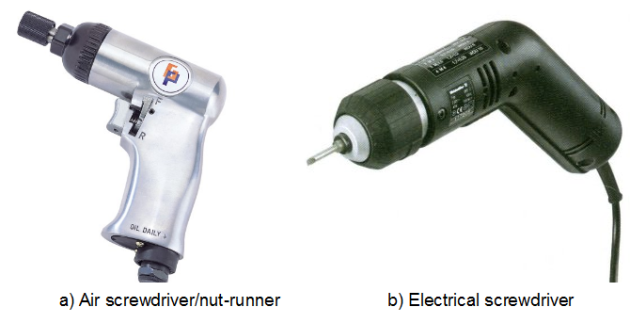
2.2. Types of screwdriver:
There are two types of power screwdriver, electrical power and pneumatic power. Some types of the screwdriver can be use as the nut-runner.
2.3. Safety / correct use:
During working with power screwdriver/nut-runner:
Keep your hair, clothing, and gloves away from moving parts.
Be sure switch is off before plugging in.
Remove adjusting keys or wrenches before turning the tool on.
Do not overreach.
Keep proper footing and balance at all times.
Use safety equipment. Always wear eye protection.
To start working with the tool: simply pull the trigger. Tool speed is increased by increasing pressure on the trigger. Release the trigger to stop. For continuous operation, pull the trigger and then push in the lock button. To stop the tool from the locked position, pull the trigger fully, then release it.
Reversing: If the power screwdriver /nut-runner has a reversing switch to change the direction of rotation. Move the reversing switch lever to the A side for clockwise rotation or the B side for counter-clockwise rotation.
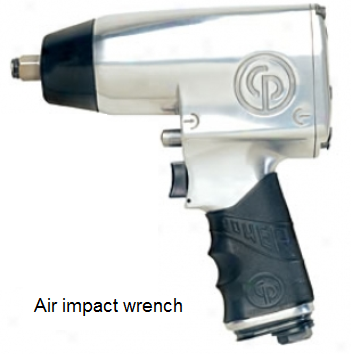
3. AIR IMPACT WRENCH:
Heavy-duty design will hold up under demanding work conditions, ample torque for most applications. Equip with variable speed, preset torque pneumatic motor.
3.1. Types of air impact wrench
There are 3 types of air–wrench:
pistol type,
straight type and
offset type.
Depend on different work, place, we do with different type of wrench.
3.2. Safety/correct use:
When we use this tool:
Always wear safety glasses with side shields.
Never leave operating tool unattended.
Make sure that any attachments are securely assembled.
Remove air hose when tool is not in use and store tool in secure location away from reach of children and or untrained users.
Remove adjusting keys and wrenches before turning the tool on.
Keep handles dry, clean, and free from oil and grease.
Never use tools which have been dropped, impacted or damaged by use.
Use only impact grade sockets on an impact wrench.
Do not apply excessive force to the tool, let the tool perform the work.
Do not pull trigger unless tool contact safety device is against work surface.
Disconnect the tool from the air supply before lubricating or changing sockets.
Before each use:
Lubricate tool,
Select the required impact socket,
Connect tool to air hose of recommended size, the use of a quick connect set makes connecting easier.
To use:
Set torque regulator, (for example see chart; each tool has a different chart), to set the desired setting to avoid over tightening.
Place tool in forward or reverse position. Push button in on “F” side for forward or “R” side for reverse.
Depress the trigger to operate tool.
Release trigger to stop tool.
Always disconnect air supply when changing sockets.
4. SANDERS:
Sanding is use to remove fabric one layer at a time during the repair process and to smooth the outer surface of some composites.
Proper sanding materials must be used in order to produce an airworthy repair.
4.1. Types of sanders:
Motor of sanders can be electrical motor or pneumatic motor, but in aviation workshop, the most common use is the air sanders.
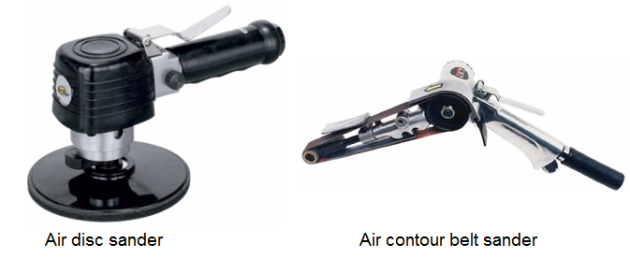
Air disc sander is an orbital action air finish sander with sealed ball bearings for longer life. Air contour belt sander is ideal for use on all composite type aircraft projects or contouring and finishing moulds and jigs.
4.2. Safety/correct use
Like all of power tools, when we do with the power sanders, we must follow the safety instruction of this tool.
a) Utilisation for the air disc sander:
Attaching sand paper:
Pull out the clamp lever and insert the paper end.
Be careful to maintain the proper paper tension.
Align edges of sanding paper with either edge of the pad. (Pre-bending the paper makes attachment easier.)
Once the paper is in place, return the clamp lever to its original position.
After inserting the paper, make sure the teeth of the clamper grip it securely.
Otherwise the paper will be loose and subject to slippage, resulting in uneven sanding operation.
How to use:
Slide thumb switch left or right for starting or stopping.
See "ON" - "OFF" indication on sander body. A sander is generally used to remove only a small amount of material at a time. Since the quality of the surface is more important than the amount of stock removed, do not bear down on the sander.
Keep the base flush with the material at all times.
Undue pressure may damage the abrasive paper and shorten tool life. Never run the tool without abrasive paper. You may seriously damage the pad.
b) Utilisation for the contour belt sander
Installing or removing the abrasive belt:
Always be sure that the tool is switched off and unplugged before installing or removing the belt.
Loop the belt over the front pulley.
Hold the tool and press down to retract the front pulley so that you can slip the other end of the belt over the rear pulley.
When pressing down the tool, be careful not to allow the front pulley to turn unexpectedly, causing you to lose control of the tool.
How to use:
Before plugging in the tool, always check to see that the switch trigger actuates properly and returns to the "OFF" position when released. If it does not operate properly, do not use the tool.
Have it repaired immediately.
To start the tool, simply pull the trigger.
Release the trigger to stop.
For continuous operation, pull the trigger and then push in the lock button.
To stop the tool from the locked position, pull the trigger fully, then release it.
The belt running speed can be adjusted and maintained by turning the adjusting dial.
Operation:
Hold the tool firmly with both hands.
Turn the tool on and wait until it attains your desired speed.
Gently apply the tool to the workpiece surface and move the tool forward and back.
Press the belt only lightly on the workpiece. Excessive pressure may damage he belt and shorten tool life.
5. POWER SAWS:
Power saw is the metal cutting tools; there are various types of power saws but the most common use in maintenance aircraft is the hand-operated power saws.
5.1. Types of hand-operated power saws:
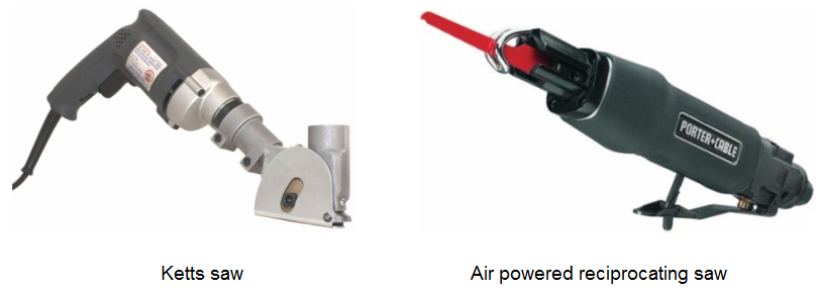
a) Ketts saw:
The ketts saw uses blades of various diameters. It cuts up to 3/16” aluminum, 1/4” wood and features retractable safety blade guard. This saw provides the capability to cut an inside or outside radius. There are 2 types of electric power and air power.
b) Air powered reciprocating saw:
At 900 to 1300 strokes per minute, this workhorse will cut through 1/8” aluminum or 1/4” wood with sheer ease.
5.2. Safety /correct use for power reciprocating saws:
Safety use:
Hold tool by insulated gripping surfaces when performing an operation where the cutting tool may contact hidden wiring or its own cord.
Never leave the trigger locked "ON". Before plugging the tool in, check that the trigger lock is "OFF".
Keep hands away from cutting area.
Do not use dull or damaged blades. Bent blade can break easily or cause kickback.
Before starting to cut, turn tool "ON" and allow the blade to come to full speed.
Tool can chatter or vibrate if blade speed is too slow at beginning of cut and possibly kickback.
Always wear safety goggles or eye protection when using this tool.
Secure material before cutting. Never hold it in your hand or across legs. Small or thin material may flex or vibrate with the blade, causing loss of control.
Make certain all adjusting screws and the blade holder are tight before making a cut.
When removing the blade from the tool avoid contact with skin and use proper protective gloves when grasping the blade or accessory.
Preparing the saw:
Blade selection:
No one blade can be efficient on all cutting jobs. Different materials require specially designed blades. Since your reciprocating saw can cut so many materials, many types of blades are available.
Installing a blade:
Unplug tool from power source before changing blade or making any adjustments.
1. Loosen the socket head cap screw and open blade clamp with the wrench provided.
2. Insert blade shank through opening in footplate and insert blade between blade clamp and plunger with hole in blade, engaged with pin on plunger.
3. Tighten the socket head cap screw and blade clamp onto the shaft pin with the wrench provided.
4. Push in and pull out on the blade to be sure it is held securely. The blade may be inserted with the teeth facing up or down.
Using the saw:
1. Securely clamp the work.
2. Mark the line of cut and grasp the tool with one hand on the handle and the other placed on the insulated rubber boot over the front housing. Always hold the saw by the insulated boot on the front housing. If you saw into a blind area where live wiring exists, you may be shocked or electrocuted.
3. Keep the saw footplate firmly against the work to minimize counter-force (jumping) and vibration.
4. Squeeze the trigger to start the tool. Let the saw reach full speed before starting the cut. Guide the saw so that the blade will move along the marked line.
6. RIVET GUNS:
The tool commonly used to drive rivets is a rivet gun.
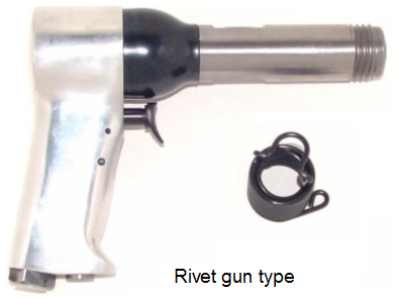
Rivet guns are powered by compressed air and are classified as light, medium, or heavy hitting.
A light-hitting gun is used to install 1/32-inch and 1/8-inch diameter rivets.
Medium-hitting guns are used to install 5/32-inch and 3/16-inch diameter rivets.
Heavy-hitting guns are used to install larger diameter rivets and some special fasteners.
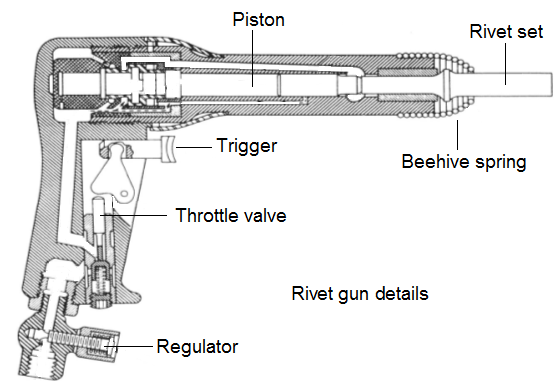
6.1. Design / ergonomics:
There are two types of gun sets: the universal and the countersink.
The universal gun set is sized to fit on the driven end of the various shapes of rivet heads. The opposite end of the universal gun set fits into the rivet gun barrel and is held in place by a beehive retainer spring.
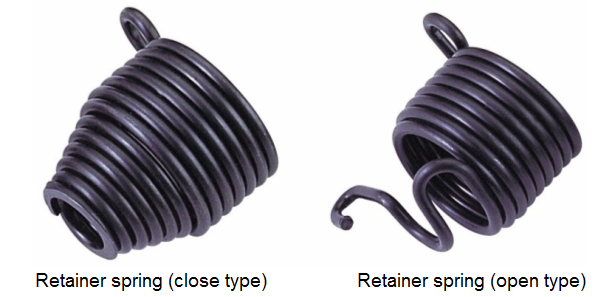
The countersink gun set is made to fit on the driven end of any size flush head rivet. A beehive retainer spring will not fit over the gun set retainer ring of the countersink gun set. It uses a specially constructed retainer spring.
Figure below shows both types of retainer springs. The retainer ring, located in the middle of the gun set, holds the retainer spring as it is threaded onto the gun barrel and prevents the gun set from accidentally flying off. The rivet gun should never be fired if the gun set is not held in place by the retaining spring.
6.2. Safety / correct use:
Some precautions to be observed when using a rivet gun are:
Never point a rivet gun at anyone at any time. A rivet gun should be used for one purpose only - -to rivet or install rivets.
Never depress the trigger mechanism unless the set is held tightly against a block of wood or a rivet.
Always disconnect the air hose from the rivet gun when it is will not be in use for any appreciable length of time.
Prepare for riveting:
We must firstly drilling a hole, after drilling we must remove all burrs with a burr remover.
Countersinking and dimpling depends on the thickness of the material. We use the drill countersink methods when the thickness of the material is greater than the thickness of the rivet head, and use the dimpling method on thinner material.
Pneumatic driving:
Select the right type and size of rivet gun and correct rivet set for the size of rivet to be driven. Install the rivet set firmly.
Adjust the speed of the riveting gun (Vibration per minute). Always press set firmly against a block of wood before pressing the strigger.
Hold the rivet set at right angles to the work to prevent damage to the rivet head or the surrounding material. Upset the rivet with a medium burst from the rivet gun.
Remove the bucking bar and check the shop head of the rivet. It should be one and one half times the diameter of the rivet in width and one-half times of the rivet diameter in height. If the rivet needs further driving, repeat the necessary procedures to finish the job.
7. GRINDERS:
It is the machine having an abrasive wheel which removes excess material while producing a suitable surface. It use for grinding hard, brittle material, such as cast iron, aluminum, brass, bronze, copper, steel...
7.1. Grinding wheels:
A grinding wheel is a cutting tool with a large number of cutting edges arranged so that when they become dull they break off and new cutting edges take their place.
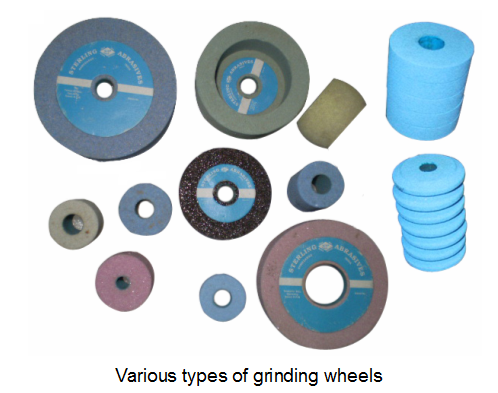
Silincon carbide and aluminum oxide are the kinds of abrasives used in most grinding wheels. The silincon carbide agent use for grinding hard, brittle material, such as cast iron, aluminium, brass, bronze, copper and the aluminum oxide agent use for grinding steel and other metal of high tensile strength.
In the grinding wheel, the abrasives particles are hold by the bond, the kind and amount of bond used determines the hardness or softness of the wheel. The commonly used bonds are vitrified, silicate, resinoid, rubber and shellac.
Resinoid bonded wheels are better for heavy-duty grinding. Rubber bonded wheels are used where a high polish is required. Shellac bonded wheels are used for grinding material where a buffed or burnished surface is needed.
7.2. Types of grinders:
a) Bench grinder:
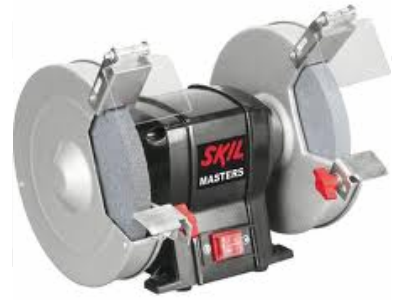
The electric bench grinder is used regularly to sharpen dull or broken drills, dress mushroomed heads on chisels, point on chisels, screwdrivers.... This type grinder is commonly used in all workshops. This is equipped with one medium-grain and one fine-grain abrasive wheel. The medium-grain wheel is used for rough grinding, the fine-grain wheel is used for sharpening tools and grinding to close limits because it remove metal more slowly, give the work a smooth finish.
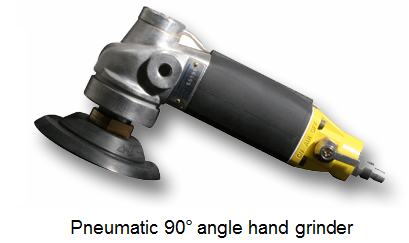
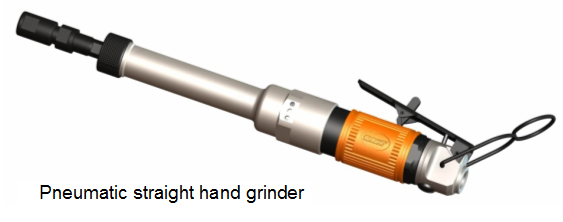
b) Pneumatic hand grinders:
The air grinder is a compact, lightweight grinder with enough power for all grinding, polishing, and buffing applications. It features a reverse exhaust port to direct air away from work.
7.3. Safety / correct use:
Before using a grinder, make sure that the abrasive wheels are firmly held on the spindles. Always wear goggles when using a grinder, even if eye-shields are attach to the grinder.
The grinding wheel best suited for sharpening drills is a fine grit stone.
When a grinding wheel becomes grooved and uneven, it should be re-dressed and squared with a dressing tool.
Care should be taken to avoid dropping the grinding wheel because it can develop small cracks which could later cause the wheel to fly apart and seriously injure the operator.